
Table of Contents
Initial Setup for First Run Feedback Export Report API Call
1-Setup
2-API Call Summary
3-Initial API Call
Further Details and Instructions
4-Basic Usage
5-Changing Users
6-Getting Filter Choices
7-Using Filters
8-Reference
Why are we using Postman?
We are using Postman as a tool for API integration testing. This becomes especially useful in cases where we need to help clients debug API call related issues taking place within their own custom applications. Since we do not have access to those environments, we use Postman to run tests and identify potential issues.
Note:
Although Postman DOES have limitations on the size of the data set that it can display, the API call in your custom application will not require additional filtering. However, in Postman it is necessary to use filtering in addition to “Questionnaire.”
1 – Setup
1a: Download and Install Postman
Postman can be downloaded from https://www.getpostman.com/ . Download the version of Postman that matches your OS and follow postman’s installation wizard instructions.
1b: Click here to download the compressed folder titled “Feedback_Export_Report_Postman_Files.zip” which contains the two JSON files that will be used in the following steps. After the download is finished, double click on the folder to extract the contents:
- “TopBox.postman_collection.json”
- “TopBox.postman_environment.json”
1c: Import API collection
- Click on “Import” at the top left of Postman
- Click on “Choose Files”
- Navigate to the location of and select the file “TopBox.postman_collection.json”
- Click on “Open”
The API collection should show up on the left side of Postman.
1d: Import Postman Environment
- Click on the “Cog” icon at the top right of Postman
- Choose “Manage Environments”
- Under the “Manage Environments” tab, Click on the “Import” button
- Click on “Choose Files” button
- Navigate to the location of and select the file “TopBox.postman_environment.json”
- Click on “open” button.
1e: Fill in the base URL environment variable
- Click on the “Cog” icon at the top right of Postman
- Choose “Manage Environments”
- With the “Management Environments” window open, click on the name “TopBox”
- Click in the field to the right of “baseUrl”
- Replace “https://localhost:44344” with your base URL “https://clients.topboxtech.com” without a trailing “/” at the end.
- Click the “Update” button towards the bottom of the window to ensure the changes were saved and click on the “x” to close the window.
1f: Ensure that the “TopBox” or the renamed environment is selected.
- At the top right of Postman, if the correct environment is not showing in the dropdown left of the “eye”, click on the dropdown and select “TopBox” or the name given to the environment in step 1d.

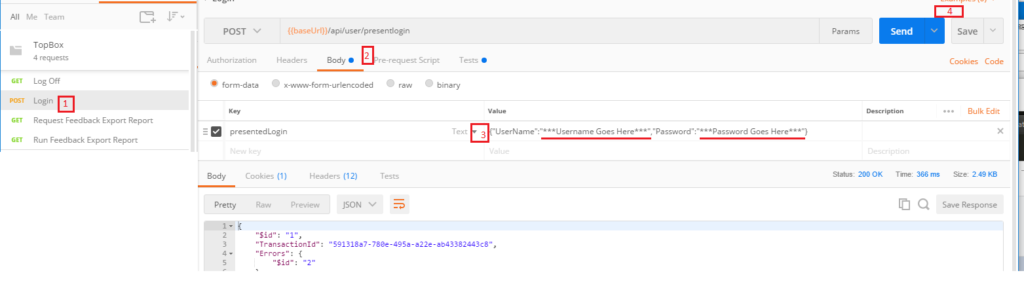
1g: Fill in User Login Information
- Click on the “Login” API call from the API collection list on the left
- Click on the “Body” tab under the Login API call URL
- In the “Value” column for “presentedLogin”, replace ***Username Goes Here*** and ***Password Goes Here*** between the quotes. Note: the quotes are required.
- Click on the “Save” button to the right of the blue “Send” button
2 – API Call Summary
Log Off – Used to ensure a clean test of the Feedback Export Report Request. The call returns “” if a user session has already been created( logged in) else the call returns html code. Either response is a valid response.
Login – Used to create a user session for postman just like you would signing into the application
Request Feedback Export Report – Generates the guid later used in the Run Feedback Export Report API call.
Run Feedback Export Report – Runs the report with or without filter data and returns the data the report would from the application for a given user(client).
Get Filter List – Used to get the list available filter choices given a report filter.
3 – Initial API Call
1- Fill in User Login Information as described in section 1g above, Save, and click Send.
2- Navigate to the TopBox Collection list on the left, select Request Feedback Export Report, and click Send.

3- Populate a set of filters prior to making a call for Run Feedback Export Report
- Navigate to the “Manage Environments” via the “Cog” icon at the top right of Postman and click on the environment titled “TopBox.”
- Populate the “getFilterName” with “questionnaire” (without the quotes), click “Update” towards the bottom of the window, and click “x” in the upper right-hand corner to close the window.
- Navigate to the TopBox Collection list on the left, select Request Feedback Export Report, and click Send. Once the run is complete, JSON code will appear in the main window.
- Note: Remember to use the dropdown menu next to the “Eye” icon to make sure that “TopBox” is chosen as the environment in use.
- In the same TopBox Collection list, select Get Filter List and click Send. Once the run is complete, JSON code will appear in the main window.
- Go back to “Manage Environments” “TopBox” and copy the contents of the “filterList” field
- Paste the “filterList” contents into a text editor of your choice, as this will break up the contents into distinct rows separated by commas. Example: {“Id” :”B454FACE-EA2C-801B-94D6-2F53C464BC84″,”Name”:”Client Relationship Questionnaire”}.
- Find the row for the Questionnaire you will be using and copy the row contents, wrapped in { }, navigate to “Manage Environments” “TopBox” and paste the contents into “reportFilterquesitonnaires” field. Syntax: Make sure that you enclose the pasted contents in [ ]. If there are multiple filter values, they need to be separated by commas, example:
- [{“Id” :”B454FACE-EA2C-801B-94D6-2F53C464BC84″,”Name”:”Client Relationship Questionnaire”},{“Id” :”ABD61DD1-9411-77CC-4C5F-E1F76B277DD6″,”Name”:”Client Relationship Questionnaire 2″}].
- Note: Because there is likely to be a large amount of data, we recommend not only filtering for one Questionnaire at a time, but also adding a Questionnaire Wave filter – as discussed in the following steps.
- In order to save the filter values added to “TopBox,” make sure to click “Update” prior to closing the window.
- Reopen the “TopBox” environment and populate the “getFilterName” with “wave” (without the quotes), click “Update” towards the bottom of the window, and click “x” in the upper right-hand corner to close the window.
- Select Get Filter List and click Send. Once the run is complete, JSON code will appear in the main window.
- Go back to “Manage Environments” “TopBox” and copy the contents of the “filterList” field
- Paste the “filterList” contents into a text editor of your choice, determine which wave/s to filter for, and copy and paste the filter values into the “reportFilterquestionnairewaves” field. Click “Update” to save your changes.
- Repeat steps 2-7 to include additional filter values in order to create a more targeted Feedback Export Report. Further details and instructions can be found in sections 6-Getting Filter Choices and 7-Using Filters .
4- Navigate to the TopBox Collection list on the left, select Run Feedback Export Report and click “Send.”
Important to note: The Run Feedback Export API call make take up to 15-20 minutes in some cases, depending on how much data there is. If it is still running after 15-20 minutes, we would recommend trying again:
- Click on Cancel Request in the main window.
- Click the blue Send button at the top right-hand corner of Postman.
Although Postman DOES have limitations on the size of the data set that it can display, the API call in your custom application will not require additional filtering. However, in Postman it is necessary to use filtering in addition to “Questionnaire.”
4 – Basic Usage
The calls need be done in order when first using the API calls :
- Log Off
- Login
- Request Feedback Export Report
- Get Filter List
- Although this is not required, Get Filter List will provide a number of filtering options to create a more targeted result for Run Feedback Report Export API call
- Populating filter options will also significantly cut down on the time it takes for the Run Report Report Export call to be completed
- Run Feedback Export Report
After the Login is run for the first time, only the Request and Run API calls need to be called unless you wish to change users. The Request call still needs to be made before the Run call.
Note: Ensure that “TopBox” or the name of the environment entered during setup is the environment selected in the dropdown at the top right and left of the “Eye” and “Cog” icon
To run a particular API call:
- Click on the name of the call on the left in the TopBox Collection list
- Then click on the blue “Send” button on the right.
5 – Changing Users
You can change the user that logs in by doing the following:
- Run the Log Off API call.
- Click on the Login API call.
- Click on the “Body” tab under the API URL.
- In the “Value” section of the presentedLogin key, set the value of the “UserName” and “Password” key value pairs.
- Click on the “Save” button at the top right.
- Click on the “Send” button to log in the user.
6 – Getting Filter Choices
Using the “Get Filter List” API call is used to get a list of available filter choices for a particular filter.
Then, with the list of filter choices, you will be able to copy them into the filter values fields for filtering results in the “Run Feedback Export Report” API call.
Note: The “Get Filter List” can also be filtered in the same way the “Run Feedback Export Report” API call is filtered. In the environment variables list, the “Get Filter List” API call filter variables are prefaced with “getFilter” whereas the “Run Feedback Export Report” filter variables are prefaced with “reportFilter”
To get a list of filter choices for a particular filter:
- Navigate to the environment variables by clicking on the“Cog” icon at the top right and click the “Topbox”
- Fill in the value field for “getFilterName” for the desired filter from the list below:

— Account Filters —
account
csm
product
region
tier
— Contact Filters —
contact_email
roles
— Questionnaire Filters —
questionnaire
wave
— Question Filters —
sentiment
overall
rating
followup_tags
Comment_tags
- Click on the “Update” button, followed by the “x” at the top right of the “Manage Environments” windows.
- Click on the “Get Filter List” API call from the list on the left
- Click on the blue “Send” button.
This step generates the list of filter choices into the value field for a variable called “filterList”.
- Navigate to the “filterList” variable by clicking on the “cog” at the top right followed by clicking on “TopBox”.
- Left click on the value field of “filterList”.
- Press “ctrl+a” to select all (“cmd+a” for Mac).
- Press “ctrl+c” to copy the list (“cmd+c for Mac).
- Open a text editor of your choice and paste the list with “ctrl+v” (“cmd+v” for Mac).
You will then be able to copy and paste the filter values into the appropriate filter value fields.
Example: {“Id” :”B454FACE-EA2C-801B-94D6-2F53C464BC84″,”Name”:”East”} wrapped in { } into the filter value fields for either the “Get FIlter List” or “Run Feedback Export Report” API call. All filters except for startdate and enddate require the filter choices to be wrapped in square brackets [ ] and multiple filter choices need to be separated by a comma.
Example for filtering the “Get Filter List” call by regions East and West:

7 – Using Filters
The filters are setup in the “Get Filter List” and “Run Feedback Export Report” API URLs with postman variables that postman substitutes when the call is made. They are both set up with all of the filters that the filter panel has in the application. Most of the filters require the “Id” field. To get the filters with their Ids, follow the steps in section 6.
To apply a filter to the Run API call:
- Click on the “Run Feedback Export Report” API call in the API call list on the left.
- Click on the “cog” at the top right.
- Click on “Manage Environments”
- Click on “TopBox” name in the environment list.
Note: Each of the report filters are setup as key and value pairs with the key names starting with “report” (**except for reportRunKey , this should not be modified**)
- Fill in the Value sections of the filters with valid JSON and with a schema the application would expect for a particular filter
All filters except for startdate and enddate (which are strings), required to be wrapped in square brackets [ ] with each filter as an object. Example of how a region filter may look like:
{“Id” :”B454FACE-EA2C-801B-94D6-2F53C464BC84″,”Name”:”East”}
Multiple filter choices for the same filter should be separated by commas :
[{“Id” :”B454FACE-EA2C-801B-94D6-2F53C464BC84″,”Name”:”East”},{“Id” :”ABD61DD1-9411-77CC-4C5F-E1F76B277DD6″,”Name”:”West”}]
Note: if you accidentally delete a filter entry altogether, make sure you hit ‘cancel’ button and reopen the edit of the environment. Or re-setup the entry with a key name as it is written in the URL of the call.
Example:

- Once all desired filters are setup, click on the “Update” button
- Click on the “x” at the top right of the Manage Environments window.
- Click on the “Send” button.
8 – Reference
Below are some original key-valid pairs that are needed for the API calls to work in case they are accidentally deleted when trying to change the “Value” field.
Original “Body” keys\values for the “Login” API call:
Key : Value
presentedLogin : {“UserName”:”***Username Goes Here***”,”Password”:”***Password Goes Here***”}
Original Environment Variables:
Key : Value
— Run Feedback Export Report —
reportRunKey : 43026D93-92D5-4711-A5D7-5E6EE4A275FD
topBoxAuthToken :
baseUrl : Your Base Url without a trailing “/”
reportFilterTag_AccountManager :
reportFilterTag_Product :
reportFilterTag_Region :
reportFilterTag_Tie :
reportFiltercontacts :
reportFiltercontactroles :
reportFilteraccounts :
reportFilterquestionnaires :
reportFIlterfirstquestionnairewaves :
reportFilterstartdate :
reportFilterenddate :
reportFiltersentiments :
reportFilteroverallquestionshortcodes :
reportFilterratingquestionshortcodes :
reportFIlterfilteredfollowuptags :
reportFilterfilteredcommenttags :
— Get Filter List —
getFilterAPIArgs :
getFilterAPIUrl :
filterList :
getFilterName :
getFilterListTag_AccountManager :
getFilterListTag_Product :
getFilterListTag_Region :
getFilterListTag_Tier :
getFilterListcontacts :
getFilterListcontactroles :
getFilterListaccounts :
getFilterListquestionnaires :
getFilterListfirstquestionnairewaves :
getFilterListstartdate :
getFilterListenddate :
getFilterListsentiments :
getFilterListoverallquestionshortcodes :
getFilterListratingquestionshortcodes:
getFilterListfilteredfollowuptags:
getFilterListfilteredcommenttags:
getFilterMinScore: 0
getFilterMaxScore: 10
Back to Table of Contents